How to install HAProxy load balancer on CentOS/Rocky Linux/Almalinux
Load balancing is a common solution for distributing web applications horizontally across multiple hosts while providing the users with a single point of access to the service. HAProxy is one of the most popular open-source load balancing software, which also offers high availability and proxy functionality.
HAProxy aims to optimize resource usage, maximize throughput, minimize response time, and avoid overloading any single resource. It is available for installation on many Linux distributions like CentOS 8 in this guide.

HAProxy is particularly suited for very high-traffic websites and is therefore often used to improve web service reliability and performance for multi-server configurations. This guide lays out the steps for setting up HAProxy as a load balancer on CentOS 8 to its own cloud host which then directs the traffic to your web servers.
As a pre-requirement for the best results, you should have a minimum of two web servers and a server for the load balancer. The web servers need to be running at least the basic web service such as nginx or httpd to test out the load balancing between them.
Installing HAProxy CentOS 8
As a fast-developing open-source application HAProxy available for installation in the CentOS default repositories might not be the latest release. To find out what version number is being offered through the official channels enter the following command.
sudo yum info haproxy
HAProxy has always three active stable versions of the releases, two of the latest versions in development plus a third older version that is still receiving critical updates. You can always check the currently newest stable version listed on the HAProxy website and then decide which version you wish to go with.
In this guide, we will be installing the currently latest stable version of 2.0, which was not yet available in the standard repositories. Instead, you will need to install it from the source. But first, check that you have the prerequisites to download and compile the program.
sudo yum install gcc pcre-devel tar make -y
Download the source code with the command below. You can check if there is a newer version available on the HAProxy download page.
wget http://www.haproxy.org/download/2.0/src/haproxy-2.0.7.tar.gz -O ~/haproxy.tar.gz
Once the download is complete, extract the files using the command below.
tar xzvf ~/haproxy.tar.gz -C ~/
Change into the extracted source directory.
cd ~/haproxy-2.0.7
Then compile the program for your system (Without SSL Support).
make TARGET=linux-glibc
Compile with SSL Support
make TARGET=linux-glibc USE_PCRE=1 USE_OPENSSL=1 SSL_INC=/usr/local/openssl/include SSL_LIB=/usr/local/openssl/lib
And finally, install HAProxy itself.
sudo make install
With that done, HAProxy is now installed but requires some additional steps to get it operational. Continue below with setting up the software and services.
Setting up HAProxy for your server
Next, add the following directories and the statistics file for HAProxy records.
sudo mkdir -p /etc/haproxy
sudo mkdir -p /var/lib/haproxy
sudo touch /var/lib/haproxy/stats
Create a symbolic link for the binary to allow you to run HAProxy commands as a normal user.
sudo ln -s /usr/local/sbin/haproxy /usr/sbin/haproxy
If you want to add the proxy as a service to the system, copy the haproxy.init file from the examples to your /etc/init.d directory. Change the file permissions to make the script executable and then reload the systemd daemon.
sudo cp ~/haproxy-2.0.7/examples/haproxy.init /etc/init.d/haproxy
sudo chmod 755 /etc/init.d/haproxy
sudo systemctl daemon-reload
You will also need to enable the service to allow it to restart automatically at system boot-up.
sudo chkconfig haproxy on
For general usage, it is also recommended to add a new user for HAProxy to be run under.
sudo useradd -r haproxy
Afterward, you can double-check the installed version number with the following command.
haproxy -v
HA-Proxy version 2.0.7 2019/09/27 - https://haproxy.org/
In this case, the version should be 2.0.7 as shown in the example output above.
Lastly, the firewall on CentOS 8 is quite restrictive for this project by default. Use the following commands to allow the required services and reload the firewall.
sudo firewall-cmd --permanent --zone=public --add-service=http
sudo firewall-cmd --permanent --zone=public --add-port=8181/tcp
sudo firewall-cmd --reload
Configuring the load balancer
Setting up an HAProxy load balancer is a quite straightforward process. Basically, all you need to do is tell HAProxy what kind of connections it should be listening for and where the connections should be relayed to.
This is done by creating a configuration file /etc/haproxy/haproxy.cfg with the defining settings. You can read about the configuration options on the HAProxy documentation page if you wish to find out more.
Load balancing at layer 4
Start off with a basic setup. Create a new configuration file, for example, using vi with the command underneath.
sudo vi /etc/haproxy/haproxy.cfg
Add the following sections to the file. Replace the server_name with whatever you want to call your servers on the statistics page and the private_ip with the private IPs for the servers you wish to direct the web traffic.
global
   log /dev/log local0
   log /dev/log local1 notice
   chroot /var/lib/haproxy
   stats timeout 30s
   user haproxy
   group haproxy
   daemon

defaults
   log global
   mode tcp
   option httplog
   option dontlognull
   timeout connect 5000
   timeout client 50000
   timeout server 50000

frontend http_front
   bind *:80
   stats uri /haproxy?stats
   default_backend http_back

backend http_back
   balance roundrobin
   server server_name1 private_ip1:80 check
   server server_name2 private_ip2:80 check
This defines a layer 4 load balancer with a front-end name http_front listening to the port number 80, which then directs the traffic to the default backend named http_back. The additional stats URI /haproxy?stats enables the statistics page at that specified address.
Different load balancing algorithms
Configuring the servers in the backend section allows HAProxy to use these servers for load balancing according to the roundrobin algorithm whenever available.
The balancing algorithms are used to decide which server at the backend each connection is transferred to. Some of the useful options include the following:
- Roundrobin: Each server is used in turns according to its weights. This is the smoothest and fairest algorithm when the servers’ processing time remains equally distributed. This algorithm is dynamic, which allows server weights to be adjusted on the fly.
- Leastconn: The server with the lowest number of connections is chosen. Round-robin is performed between servers with the same load. Using this algorithm is recommended with long sessions, such as LDAP, SQL, TSE, etc, but it is not very well suited for short sessions such as HTTP.
- First: The first server with available connection slots receives the connection. The servers are chosen from the lowest numeric identifier to the highest, which defaults to the server’s position on the farm. Once a server reaches its maxconn value, the next server is used.
- Source: The source IP address is hashed and divided by the total weight of the running servers to designate which server will receive the request. This way the same client IP address will always reach the same server while the servers stay the same.
Configuring load balancing for layer 7
Another possibility is to configure the load balancer to work on layer 7, which is useful when parts of your web application are located on different hosts. This can be accomplished by conditioning the connection transfer for example by the URL.
Open the HAProxy configuration file with a text editor.
sudo vi /etc/haproxy/haproxy.cfg
Then set the front and backend segments according to the example below.
defaults
   ...
   mode http
   ...

frontend http_front
   bind *:80
   stats uri /haproxy?stats
   acl url_blog path_beg /blog
   use_backend blog_back if url_blog
   default_backend http_back

backend http_back
   balance roundrobin
   server server_name1 private_ip1:80 check
   server server_name2 private_ip2:80 check

backend blog_back
   server server_name3 private_ip3:80 check
The front end declares an ACL rule named url_blog that applies to all connections with paths that begin with /blog. Use_backend defines that connections matching the url_blog condition should be served by the backend named blog_back, while all other requests are handled by the default backend.
On the backend side, the configuration sets up two server groups, http_back like before and the new one called blog_back that servers specifically connections to example.com/blog.
After making the configurations, save the file and restart HAProxy with the next command.
sudo systemctl restart haproxy
If you get any errors or warnings at startup, check the configuration for any mistypes and that you have created all the necessary files and folders, then try restarting again.
Testing the setup
With the HAProxy configured and running, open your load balancer server’s public IP in a web browser and check that you get connected to your backend correctly. The parameter stats uri in the configuration enables the statistics page at the defined address.
http://load_balancer_public_ip/haproxy?stats
When you load the statistics page and all of your servers are listed in green your configuration was successful!
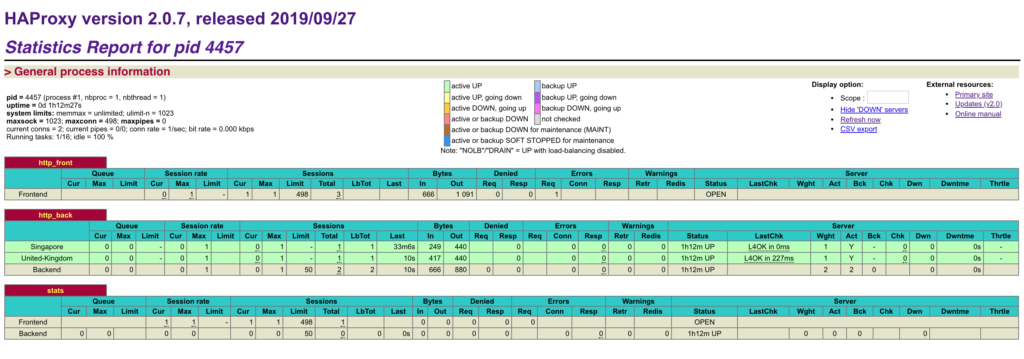
The statistics page contains some helpful information to keep track of your web hosts including up and downtimes and session counts. If a server is listed in red, check that the server is powered on and that you can ping it from the load balancer machine.
In case your load balancer does not reply, check that HTTP connections are not getting blocked by the firewall. Also, confirm that HAProxy is running with the command below.
sudo systemctl status haproxy
Password protecting the statistics page
Having the statistics page simply listed at the front end, however, is publicly open for anyone to view, which might not be such a good idea. Instead, you can set it up to its own port number by adding the example below to the end of your haproxy.cfg file. Replace the username and password with something secure.
listen stats
   bind *:8181
   stats enable
   stats uri /
   stats realm Haproxy Statistics
   stats auth username:password
After adding the new listen group, remove the old reference to the stats uri from the frontend group. When done, save the file and restart HAProxy again.
sudo systemctl restart haproxy
Then open the load balancer again with the new port number, and log in with the username and password you set in the configuration file.
http://load_balancer_public_ip:8181
Check that your servers are still reporting all green and then open just the load balancer IP without any port numbers on your web browser.
http://load_balancer_public_ip/
If your backend servers have at least slightly different landing pages you will notice that each time you reload the page you get a reply from a different host. You can try out different balancing algorithms in the configuration section or take a look at the full documentation.
Conclusions: HAProxy load balancer
Congratulations on successfully configuring the HAProxy load balancer! With a basic load balancer setup, you can considerably increase your web application performance and availability. This guide is however just an introduction to load balancing with HAProxy, which is capable of much more than what could be covered in first-time setup instruction. We recommend experimenting with different configurations with the help of the extensive documentation available for HAProxy, and then start planning the load balancing for your production environment.
While using multiple hosts to protect your web service with redundancy, the load balancer itself can still leave a single point of failure. You can further improve the high availability by setting up a floating IP between multiple load balancers.
