How to Use the Linux rsync Command for Remote Directory Synchronization
The Linux remote sync command lets you easily synchronize files or directories between multiple destinations. For instance, you can move files to a remote machine or between directories within the same system.
This Linux command helps improve development efficiency since you can sync a source and destination file directly using one system. Even if you disconnect during the transfer, rsync lets you continue the process once the connection is re-established.
To help you understand more about the command, we will explain the rsync syntax, installation steps, and usage. We’ll also provide several rsync command examples for various tasks.
The Basic rsync Syntax
The rsync command differs depending on the task, but the basic syntax is always as follows:
rsync options SRC DESTHere are the parameters you can modify and their functions:
- options – the actions to execute
- SRC – the source directory, like ~/dir
- DEST – the destination directory or machine
If you run the command, rsync will perform a file system scan on both the source and destination directories. Then, it will identify their differences to determine which files to transfer.
rsync Syntax for Remote Shell
The rsync remote shell command syntax differs slightly depending on your operation. To retrieve files from the remote system, use the rsync command for the pull operation:
rsync options USER@HOST:SRC DESTMeanwhile, use the rsync protocol for the push operation to send files from a local computer to a remote server:
rsync options SRC [USER@]HOST:[DEST]How to Check the rsync Version
Checking rsync version requires connecting to a virtual private server (VPS) using Terminal or an SSH client like PuTTY. Once connected, run this command:
rsync --versionIf rsync is installed, your command line interface (CLI) will return the version number. Here’s how the output looks on an Ubuntu VPS:
rsync version 3.1.3 protocol version 31 Linux distributions commonly include rsync by default. However, if the CLI returns the following error message, rsync isn’t installed: rsync: command not found
How to Install rsync
If your machine doesn’t have rsync, install it manually first. Before installing rsync, we recommend updating your system’s package to prevent potential errors.
For Debian-based Linux distributions like Ubuntu, execute the following commands to update the package and install rsync:
apt-get update
apt-get install rsync
Meanwhile, use these commands for rpm-based distributions like Fedora and CentOS:
yum update
yum install rsync
On MacOS systems, use the following commands:
brew update
brew install rsync
Check the version to verify whether the rsync installation was successful. If it returns the version number, you can start using the command.
How to Use rsync Commands
To demonstrate how the command works, we will create original and duplicate directories on our Linux system. The original folder contains three files, while the duplicate is an empty directory.
To create the test directories, use the following commands:
cd ~ mkdir original
mkdir duplicate
touch original/file{1..3}
To double-check, use the ls command to list all the files inside the directory:
ls originalThe output will look similar to this:
File1 File2 File3After the folders are set, use the following command to sync files in the original directory into duplicate.
rsync original/* duplicate/The * instructs rsync to synchronize all files in the original directory to the duplicate. If we add new files and rerun the command, it will only copy the new ones. It makes the feature useful for transferring files over a limited bandwidth network.
Using the Most Common rsync Commands
The rsync command options vary and have different purposes. Here is a list of the most commonly used ones:
- -a or –archive – enables archive mode to preserve device files, modification dates, symbolic links, and permissions.
- -v or –verbose – shows detailed visual information about the transferred file.
- -h or –human-readable-format – convert file sizes into a more readable format such as KB, MB, or GB.
- -z or –compress – compresses the transferred file data to reduce their size.
- -r – enables the recursive copying mode.
- –stats – shows the file transfer stats.
- -s or –sparse – preserves sparse files’ space-saving properties.
- –daemon – runs rsync daemon that runs in the background.
- –log-file-format – creates a log file for the synchronization using the specified format.
Using rsync Commands With Subdirectories
By default, rsync will only copy files from the main original folder, excluding subdirectories. To include them, use this command:
rsync -r original/ duplicate/The -r option tells rsync to enable the recursive copying mode, which includes all subdirectories and files from the folder. The / modifier after original instructs the command to copy the original directory’s content to the duplicate folder.
Synchronizing Files With rsync
Synchronizing files means you copy content from the destination folder that the original directory doesn’t have. It helps ensure both directories contain the same files.
Here’s the command for synchronizing files to the original directory:
rsync -r original duplicate/Combining Commands Using rsync
Combining rsync commands lets you change the option’s default behavior. For example, here’s a code that combines -a and -v options:
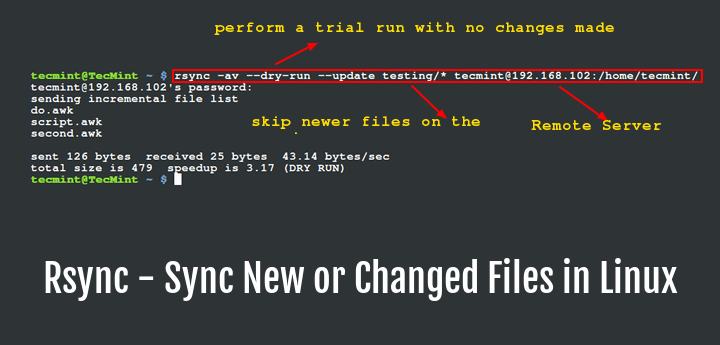
rsync -av --dry-run original/ duplicate/The -a option keeps the copied files’ permissions, modification times, and other attributes. Meanwhile, the -v option will show the files’ information in detail. Finally, the –dry-run option lets you run the command to see if it works as intended without actually copying the files.
So, the command will output the list of files it will copy with their detailed information. However, it doesn’t make any modifications. To start the actual synchronization, rerun the command without –dry-run.
Creating rsync Backup
rsync lets you create incremental backups that automatically sync whenever you modify the source files and rerun the command. Here’s a command example:
rsync -a --delete --backup --backup-dir=/path/to/backup /path/to/SRC DESTIn the snippet, we combine –backup with the –dir option to create backup files and specify their storage location. The –delete command removes preexisting destination files to avoid duplicates. The SRC and DEST refer to your source and destination directory.
Suppose you want to delete the synchronized files in the source and only keep the backup ones. Add the –remove-source-files option.
Adding Progress Bar in rsync
Another option in rsync is -P, a combination of –progress and –partial. It keeps partially transferred files and shows a progress bar, allowing you to resume any interrupted file transfers. Here’s an example code:
rsync -azP SRC DESTThe output will look similar to this:
sending incremental file list ./
file1 0 100% 0.00kB/s 0:00:00 (xfer#1, to-check=1/3)
file2 0 100% 0.00kB/s 0:00:00 (xfer#2, to-check=2/3)
file3 0 100% 0.00kB/s 0:00:00 (xfer#3, to-check=3/3)
Running the same command returns a shorter output since no new changes have taken place. Here’s how the output will look:
sending incremental file list
send 26 bytes received 5 bytes 1200.00 bytes/sec
total size is 0 speedup is 0.00
If you only want to transfer certain files, specify them with the following command:
touch original/file{1..5}
rsync -azP SRC DEST
The output will be similar to the previous command, only with the files specified between the curly brackets.
Other Options for rsync Commands
Combining the -a and -v options will make -av. It increases verbosity or the level of detail for the displayed file information. Here is what the command looks like
rsync -av original/ duplicate/If you want to sync two directories and delete the items in the duplicate folder that the original one doesn’t have, add the –delete option:
rsync -av --delete original/ duplicate/You can also exclude specific files or subdirectories when syncing two folders. To do so, add -exclude=. To specify more than one file, separate them using a comma.
rsync -av --exclude=file1,file2 original/ duplicate/You can also include specific files or subdirectories using the -include= options. Moreover, you can combine it with the -exclude= option. The example below will include files that begin with the letter L and exclude all the others:
rsync -av --include=L* --exclude=* original/ duplicate/In addition, rsync lets you specify the maximum file size to sync using the –max-size option. Here’s a command example to set the max size to 10 KB:
rsync -av --max-size=10k original/ duplicate/In addition, you can transfer files or directories between a local and remote system. Here’s an example command:
rsync -az ~/Desktop/Original [email protected]:~/tmp/Using the -z or –compress option will consolidate the data, while -a ensures all file permissions and attributes are also copied.
~/Desktop/Original is the source directory on the machine you’re logged into. While [email protected]:~/tmp/ indicates the destination.
Replace [email protected] with the destination remote host address and ~/tmp/ with the directory.
Conclusion
The rsync command lets you easily synchronize files and directories between multiple destinations.
After execution, rsync finds files already in the destination system to avoid transferring the same one, saving time and bandwidth.
To start file transfer with rsync, connect to your VPS using Terminal or an SSH client. Install and execute rsync with the desired options based on your tasks. For example, use the -v option to copy subdirectories.
You can also combine multiple options to run a more specific task, such as -avr. In addition, you can create a backup, add the file’s data attributes, and enable a progress bar to track synchronization.