Linux – Resize-Extend a disk partition with unallocated space (CentOS, Ubuntu, VM)
Expanding disk partitions to use all the available (unallocated) disk space is a common issue among Linux Administrators, expecially when working in a VMware-based Cloud environment. This often happens when deploying a Linux VM from an existing template using managed services like Amazon AWS or MS Azure, when we usually end up with disk partitions smaller than the disk space allocated during the VM configuration phase; but it can also happen after the deployment, for example when our VM’s main disk runs out of space – and we want to further expand it by allocating additional space from the vCenter.
In this post we’ll briefly explain how to fullfill such task in most Linux operating systems – such as CentOS, RHEL, Ubuntu, Debian and more – using a simple & secure approach based on four convenient built-in tools: parted, partx, pvresize and lvextend. The best part about such techinque is that it doesn’t even require a reboot, which makes it definitely better than other reboot-based approaches such as this one.
STEP #1: retrieve the names
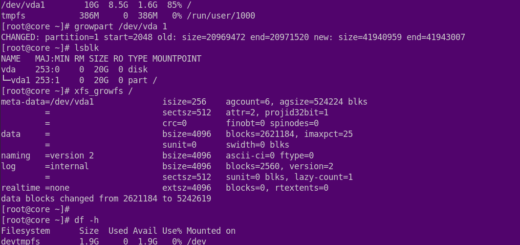
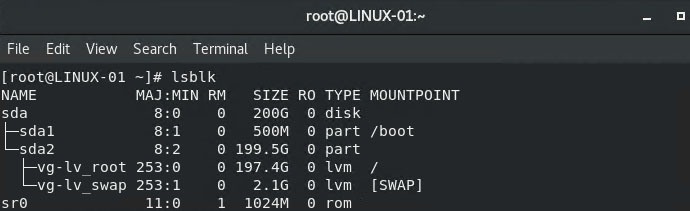
The first thing we need to do is to retrieve the names of the disks and the partition we want to resize. To do that, execute the lsblk command to show the system’s information about all available block devices. In this tutorial we’ll take the following scenario as an example:
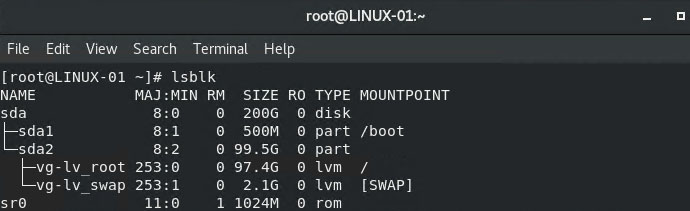
By looking at the above screenshot we can easily determine the following:
- The fixed disk is called sda and has a total size of 200GB.
- Inside the sda disk we do have two partitions: sda1 (boot) and sda2 (which hosts a Logical Volume Manager).
- The sda2 partition contains a single volume group (vg) and two logical volumes: lv_root (97.4G), which is where all our system files are located, and the lv_swap (2.1GB), which is the swap partition.
As we can easily see, we do have roughly ~100GB of unallocated space on the sda disk: in this tutorial we’ll see how we can assign them to the lv_root logical volume, thus extending it from 97.4GB to 197.4GB (or so on).
It’s worth noting that the names of the above items may vary: for example, the volume group might be called centos, ubuntu, or something like that instead of vg; the logical voumes might be more or less than two and also have different names, such as var and swap instead of lv_root and lv_swap. Just be sure to properly identify the names of the disk, the partition and the logical volume we want to expand before proceeding.
STEP #2: perform the extend/resize task
Now that we’ve successfully recovered the disk name (sda), the partition name (sda2), and the names of the volume group (vg) and logical volume (lv_root) we want to resize/extend, we can proceed with the actual task.
Open a terminal window (with root permissions) and type the following commands, replacing the names of our sample scenario with those recovered early on:
| parted —pretend-input-tty /dev/sda resizepart 2 100%partx -u /dev/sdapvresize /dev/sda2lvextend -r vg/lv_root /dev/sda2 |
Here’s a brief explanation of the above commands:
- parted – this command extends the second partition of the sda disk (which is sda2) using 100% of the unallocated disk space
- partx – this command updates the kernel in-memory partition table
- pvresize – this command resizes the sda2 partition’s physical volume using the newly allocated disk space
- lvextend – this command resizes the lv_root logical volume and filesystem using the newly available disk space
As soon as we issue these four commands, we can issue the lsblk command again and see what happened to our system’s devices:
As we can see, the resize/extend operation has been completed without flaws: the lv_root logical volume (and filesystem) has been successfully extended from 97.4GB to 199.5 GB. The newly available space is also ready to use, without requiring a reboot.
Conclusion
That’s it, at least for now: we sincerely hope that this post will help other System Administrators to resize/extend the disk space of their CentOS, RHEL, Ubuntu, or Debian Linux Virtual Machines.