Resize-Extend a disk partition with unallocated disk space in Linux – CentOS, RHEL, Ubuntu, Debian & more
Expanding disk partitions to use all the available (unallocated) disk space is a common issue among Linux Administrators, expecially when working in a VMware-based Cloud environment: deploying a Linux VM from an existing template will often lead to disk partitions smaller than the disk space allocated during the VM configuration phase.
Consider the following scenario:

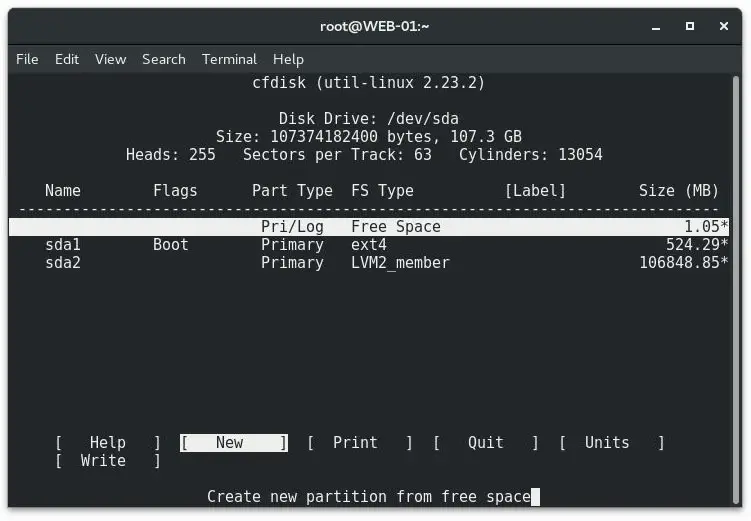
This screen can be obtained by running cfdisk from the terminal and shows the following:
- a 524MB boot partition [sda1]
- a 6.8GB drive [sda2], used by the Linux OS and all its installed packages.
- 100GB of unallocated space
It would be great to extend that puny 6.8GB partition and make it become a 106.8GB drive… How can we do that? If you take a look around you’ll see that the web is awfully short of a quick and effective tutorial for this: that’s why I eventually chose to write my own guide: here it is!
Luckily enough, we won’t need anything fancy to perform our task: we’re just going to make good use of fdisk , pvresize , lvdisplay and lvextend , some handy command-line tools shipped with any Linux distribution: that’s great to hear, since it means that this tutorial will work for any Linux distro, including CentOS 5.x, CentOS 6.x, CentOS 7.x, RHEL, Ubuntu, Debian and more!
Step 1: Alter the Partition Table
The first thing we need to do is to modify our partition table to make sda2 end at end of disk: don’t worry, you will not lose your existing data! However, this task will require a reboot in order to write the changes that we’re going to make and also to re-read the updated partition table.
Let’s start with running the following command: fdisk /dev/sda
| 1 | fdisk /dev/sda |
This will make the terminal enter in fdisk mode: once there, type p to print the current partition table: it’s very important to keep note of the numeric values of the START and END columns for the /dev/sda2 partition, as we’re going to need them soon enough. If you want to be sure to not lose them or typing them wrong, just print-screen or paper-print them.
Once done, type d to access the delete mode, and then the number of the partition record that you want to remove (that would be 2 in the above scenario). Again, DO NOT WORRY: you’re not deleting the partition data, just its mapping addresses on the partition table.
Right after that, type n to create a brand-new second partition: choose the same partition mode of the previous one (that would be Primary in the above scenario), then input the START numeric value you’ve recorded earlier – which shoud be the suggested default; also, make sure that the end is at the end of the disk – which should also be the default.
Last but not least, we need to change the partition type from Linux to Linux LVM: to do so, type t to access the change partition type mode, then 2 , then 8e and that’s it.
When done, type p to review your new partition layout. Be sure to triple-check that the start of the new second partition is exactly where the old second partition was: this is very important! In case you did it wrong, type d to delete the wrong partition and start over.
If everything looks right, issue w to write the partition table to disk.
Step 2: Reboot
Right after writing the new partition table to disk, you’ll immediately get a system error message due to the fact that the partition table couldn’t be accessed for read, because the disk is in use. That’s why we need to reboot our system.
Step 3: Expand the LVM Partition
Wait for the system to reboot, then issue the following command: pvresize /dev/sda2
| 1 | pvresize /dev/sda2 |
Right after that, run cfdisk again now. If everything went good, you should see the following:
Meaning that our physical LVM volume has been extended to rest of the drive: a second reboot would be required to ensure that all the services will take into account the new volume size.
Step 4: Extend Logical Volume
The next thing we need to do now is to extend our logical volume into that space. In order to do that we need to retrieve its path, which can be done by issuing the following command: lvdisplay -v
| 1 | lvdisplay -v |
It should be the first of the list: however, you can easily figure out what it is by looking at the volume sizes. In the above scenario, the path is /dev/vg/lv_root .
Once retrieved, we can extend that logical volume with the following command: lvextend -l +100%FREE /dev/vg/lv_root
| 1 | lvextend -l +100%FREE /dev/vg/lv_root |
Step 5: Extend the File System
Now that the logical volume has successfully been extended to use all the unallocated space, we still have to perform one last step: increase the file system to match the logical volume size. Doing that is just as easy as typing one of the following command, depending if we’re using EXT4 (which should be the default nowadays) or XFS. Again, we have to use the logical volume path here, the same one that we’ve used with the lvextend command a moment ago.
For EXT4, type the following: resize2fs /dev/vg/lv_root
| 1 | resize2fs /dev/vg/lv_root |
For XFS, type the following: xfs_growfs /root
| 1 | xfs_growfs /root |
This will trigger the on-line resizing of the file system, which will be extended in order to use all the available logical volume space.
… And that’s it! I hope that this post will help more System Administrators in working with their Linux systems.